|
|
Here is my inking lineart tutorial. I'm not going to teach you HOW
to draw something; right now, I'm going to assume you already have
a
general concept of drawing. I might make a few drawing tutorials
in the future, but as I'm still learning myself, I honestly don't
think I'm qualified yet, and there are much better drawing tutorials
out there. :P While many artists use their digital art programs to
ink, I still prefer to do my inking by hand, which is what I'll go
by in this lesson.
For this lesson, I actually used the same image as in my Comic
Coloring tutorial, so this is a comic page (6th in a series
of 13) rather than a "normal" picture. However, the same
principles apply.
This tutorial, like most of my digital art tutorials, uses Paintshop
Pro (version 8). It has similarities to Photoshop, but there will still
be some differences. Since I don't have a copy of Photoshop with me,
I can't specify these differences. However, if you know/find out differences
between the programs in using similar methods, please e-mail
me so
I can post them on here for everyone to see! :)
And now, I give you my...
Inking and Importing Lineart Tutorial
|
Materials Used: |
*These
are what I used and are a general guideline -- for the most part,
if you have other tools that
you use that give the same results, feel free to use them instead
+ Col-erase Blue Drafting Pencils (blue colored pencils work
as well, but use lighter hues and remember they don't erase as well)
+ Kneaded eraser
+ Gum eraser
+ Pencil Sharpener =P
+ Black Ink Sakura Micron Pens (Sizes .005, .01, .02, .03)
+ Black Ink Sakura Brush Pen
+ Scanner =P
+ Paintshop Pro 8
+ Mouse to "draw", though a tablet works as well (I own one and usually
use it, but not this time through) |
Step 1: Draw
Your Picture |
Click thumbnail for a larger view. |
As I said
in the introduction, I'm going to assume you know how to draw.
Here, I drew with a Col-erase blue drafting pencil -- you can find
these in most office and art supply stores, but if you're too lazy
to look, they can be found at many online stores such
as this one (which is where I actually bought mine a few years
ago).
I highly recommend blue because while it's dark enough to see what
you're drawing in the original, after you've inked the image and
are scanning it in, the blue won't show up. This eliminates the
need to erase all the sketch work and allows you to be a bit messier
in your drawing stage. :)
(For the thumbnail image here, I had
to use PSP to darken it many times before it was visible enough
on the computer)
If you can't find or can't/don't want to buy a drafting pencil,
then a lighter blue colored pencil will work just as well -- though
keep in mind most colored pencils don't erase as well as drafting
pencils, so that may be an issue for you in your drawing stage.
Also, I wouldn't recommend using the expensive, high quality Prismacolor
pencil for drawing this -- they can be put to much better use.
;D Cheap colored pencils like Crayola or even (bleh) Roseart would
serve you better.
Once your drawing is complete, it's time to start inking. |
|
Step 2: Ink
Your Lineart |

Click thumbnail for a larger view. |
Time to ink
your lineart. Go over the main areas, and be careful to avoid accidentally
inking "construction" lines and the like -- only ink what
you want to color, or, maybe in some cases, something that serves
as a "placeholder"
that you intend to remove on the computer later with something CGed
in its place. Here's a few tips on inking:
1. Vary your line width.
2. Use different sized pens.
3. Don't fret over mistakes -- we'll be fixing those on the computer
in later steps.
I used Sakura Micron and Brush pens to ink -- these can be found
at most any art supply store (I bought mine at Michael's), but once
again,
if
you're lazy, here's an online store for the micron
pens and one for
the brush pens.
While any free-flowing black ink pen will work, I highly recommend
getting at least a few different-sized micron pens, as they get detail
in. If possible, get a brush pen as well -- I actually used that
pen the most.
Use the smaller pens (.005, .01) to ink more detail areas such as
eyes, lesser creases in clothing, teeth detail, etc. Use the larger
sizes (.02, .03) for other detail areas that require thicker lines,
such as hair, eyebrows, prominent creases in clothing, etc. Use the
brush pen for pretty much everything else.
Important: When using the brush pen, be very careful:
It is very sensitive to pressure put on it, and it takes very little
effort to get thicker lines. Start out with very gentle strokes,
then press down slightly harder in some areas to get a thicker line.
Where your thicker and lighter lines are up to you -- just try to
vary the lines a bit, as it tends to give the image more depth. This
is something that takes lots of practice to perfect -- I'm still
working on it, myself.
Once your lineart has been inked and all the lines are dry (you don't
want to get ink on your scanner or hands), it's time to bring it
onto your computer using a scanner. |
|
Step 3: Scan
Your Image In |

Click thumbnail for a larger view. |
*NOTE: If you wish to import the image directly into
Paintshop Pro, skip this step and move on to Step 4B*
Of course,
place your paper in your scanner, making sure it's straight. Opening
up your scanning program, and scan in your image with these settings:
Color/Output: Black and White
Resolution: 300 dpi
Scanners vary, so exactly how you find this settings are different
for everyone, but they're usually found in the preview window under
one of the properties windows. Look around.
Now that your image is scanned, it's time to bring it into Paintshop
Pro. |
|
Step 4: Import
into Paintshop Pro |
4A:
Click thumbnail for a larger view.

Click thumbnail for a larger view.
Click thumbnail for a larger view. |
There are a few ways of importing your
scan into PSP. If you wish to import your image indirectly (i.e.
open it in your scanning software first and therefore saving it in
your default scans folder), continue to Step 4A below. If you want
to scan it directly into PSP, skip down to Step 4B.
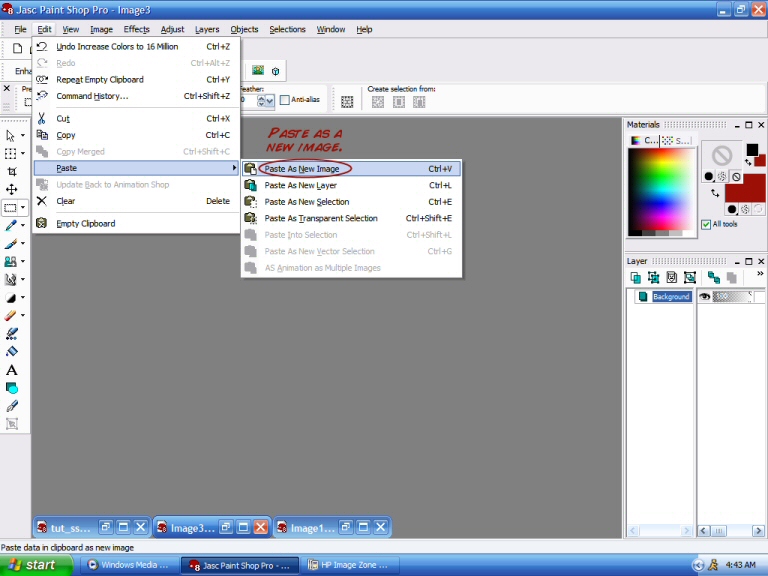
4A. Your scanning program
should open up after you've scanned the image in. Open up your image
in your scanning program (I have HP Image Zone).
Next, select "Copy Image To Clipboard/Edit >>> Copy" or whatever
variation of this your program has. If this isn't available for whatever
reason, see if there is an "Import To..." option and select PSP from
the list of programs. If you still can't find what you're looking
for, search through your program's help files.
I have a few screenshots off to the side to show how I copied my
scan from HP Image Zone.
4B. PSP has the nifty option
of importing your scans directly into it. Here's how:
1. Go to "File"
2. Mouse over "Import"
3. Mouse over "TWAIN"
4. Select "Acquire..."
This should automatically open up your scan window and start your
scanner. Make sure you scan the image in Black and White and
at 300 dpi. Accept the scan and go back to Paintshop
Pro -- your scan will be there (or it will be in a moment, depending
on the speed of your scanner and computer).
Now that your image is in PSP, it's time to clean up the lineart. |
|
Step 5: Correct
Errors |
1C:

2C:
3C:
4C:
1D:
Click thumbnail for a larger view.
2D:
Click thumbnail for a larger view. |
A. If you
scanned the image directly into PSP and/or have a version of PSP
older than
8, you'll probably have to increase the color depth, otherwise
the only colors you can use are black and white. How this is done
in
8 differs slightly from earlier versions, so I will show both ways:
PSP 8:
1. Go to "Image"
2. Mouse over "Increase Color Depth"
3. Select "16 Million Colors (24 Bit)"
PSP 6 & 7:
1. Go to "Colors"
2. Mouse over "Increase Color Depth"
3. Select "16 Million Colors (24 Bit)"
Or, more simply, if I remember correctly, the shortcut key in all
three programs for this is "Ctrl+Shift+0"
B. After you've (or if you
didn't need to) increased the color depth, it's time to edit the
mistakes in the lineart. There might be few, or there might be
many, minor or major. Whatever the case, let's start first by fixing
any
excess lines:
*Note: The next steps are signifigantly different in pre-PSP 8 versions;
unfortunately, I do not have my copy of PSP 7 at the moment, so I
can only show you PSP 8's way of doing it for the time being. When
I get my PSP 7 back from my parents, I'll install it on my computer
here and add the alternative directions here.
1. Select the Pen tool. 
2. Look to the top of the program window at your tool settings.
If it's not there, right-click anywhere at the menu choice; a new
menu
window will pop up by your pointer. Choose "Palettes >> Tool Options"
and it will appear.
3. Set your Pen tool settings as such (here
is screencap of the settings):
A. Simple Mode UNchecked
B. Drawing Mode ON
C. Freehand Segment Type
D. Anti-alias UNchecked
Anti-alias makes your lines smoother, however, you don't want that
at the moment -- you want solid colors so it'll be easier to make
corrections. Besides, once you resize your image after coloring
(which won't be covered here), the lines will be smoother automatically.
In PSP 8, "Simple Mode" just shows the lines you draw as
they are.
When it is off, it shows all
the points that make up what you drew
with the pen tool, allowing you to adjust the lines by clicking,
holding, and dragging the points to other locations. You can turn
simple mode on and off as you please, but keep in mind that you can
no longer edit a line's points once you've saved or switched to another
tool unless your line is a vector (and it shouldn't be here).
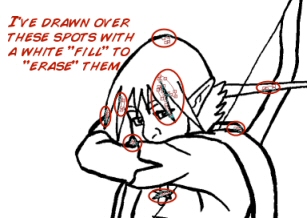
C. Using the pen tool with white
as your background color
and NO foreground color selected, draw around any
unwanted lines (see screencaps 1C and 2C).
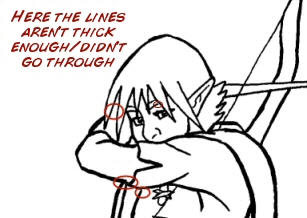
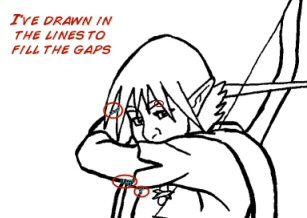
Once you've removed the excess lines, check your lineart for any
gaps in it that your scanner may not have picked up or you forgot
to ink in by hand. Change your color settings to black
as your foreground color
and NO background color. Using the pen tool
again, draw in lines to fill these gaps, using the points to adjust
the
lines as need be (see screencaps 3C and 4C).
Tip: When a line can still be edited with the
points, you can actually adjust its thickness with little effort.
Go to the toolbox window, find "Width" and change the number to
your desired thickness. You cannot do this if you can't edit the
lines point by point.
This process can take a while, but be patient (I know, it can be
hard :D). It's well worth cleaning up any problems you made by
hand. Sometimes when you redraw lines, you'll go too far over and
you'll have to "erase" parts of those as well. Don't worry about
filling it every little white dot within your otherwise solid black
lines -- unless these are noticable when you zoom out to about
25%, they disappear after you resize anyway. Just keep editing
until you're
satisfied
with how it looks.
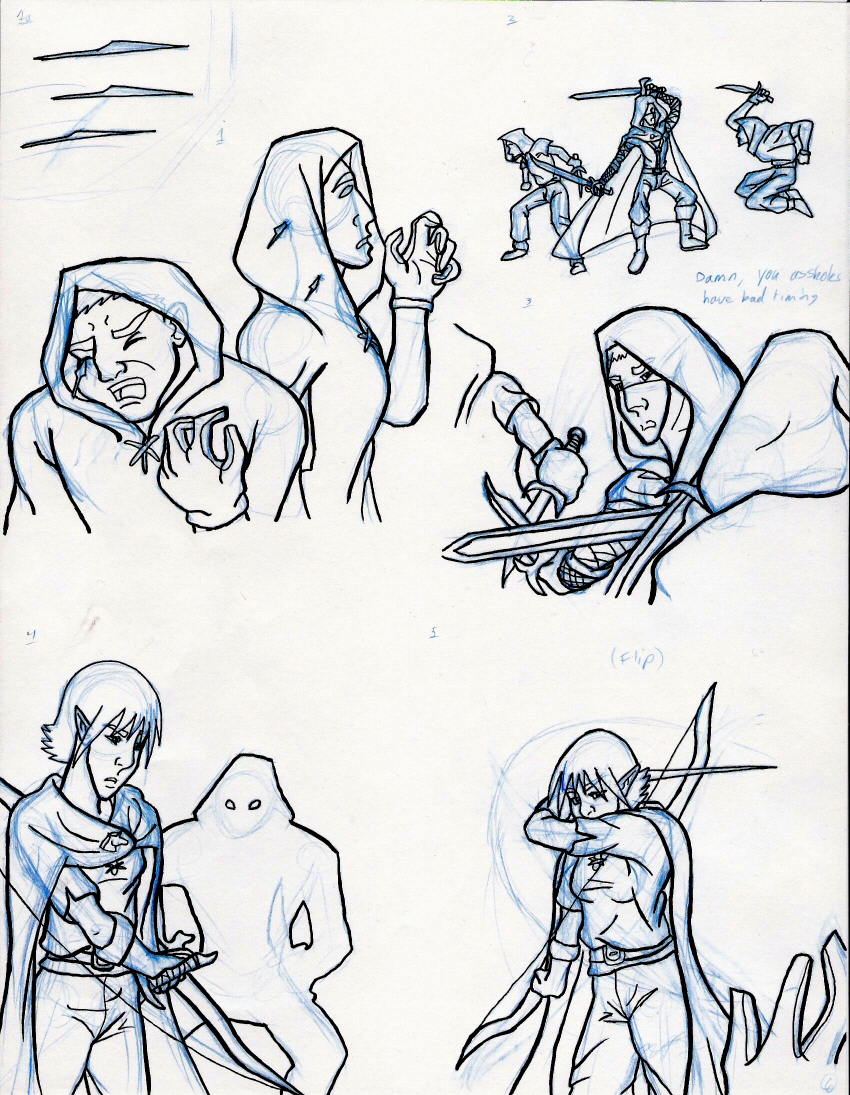
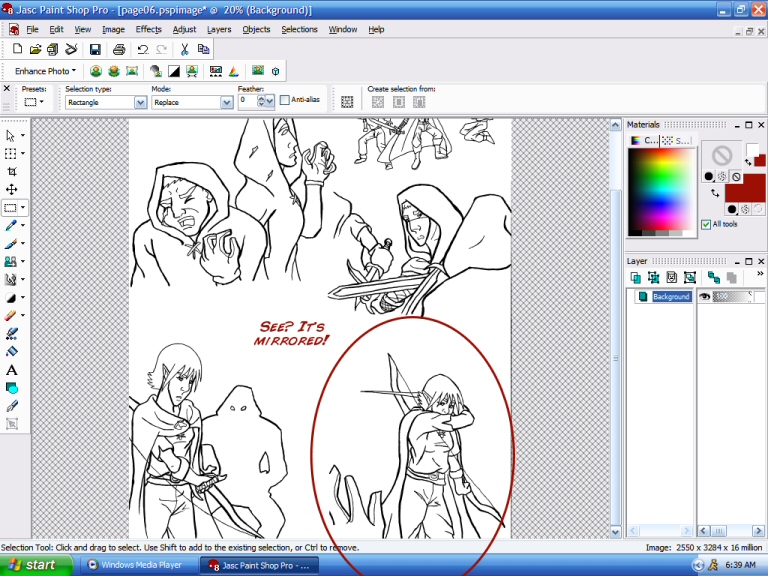
D. Other mistakes: Though
fixing up the quality of the lineart is the primary point here,
perhaps you found a few other errors in your work. For example,
in this page, I realized after I had inked and
scanned it that Saeola drew her sword with her right hand in panel
4, yet in panel 5 she's holding it in her left arm. Whoops. This
can be fairly easy to correct, however. If you encounter similiar
problems to this in your art, try these steps (depending on your
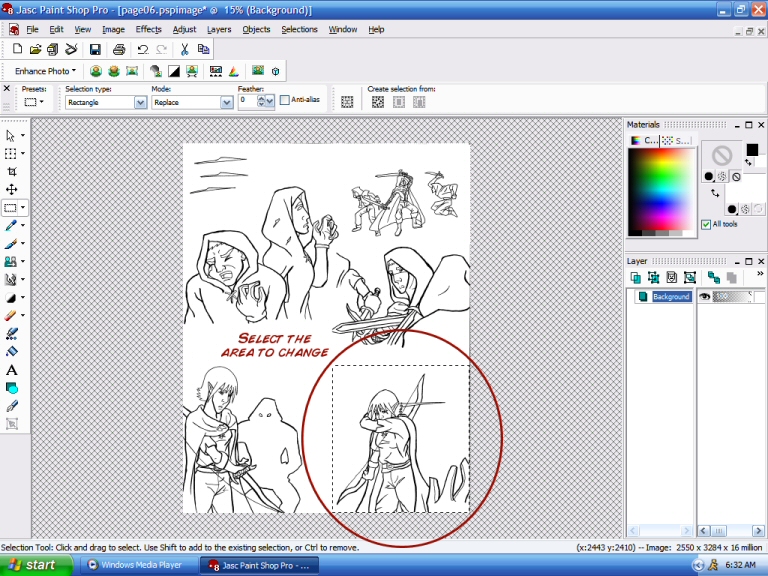
specific needs, you may need to alter a few of these on your own):
1. Click the Selection Tool. 
2. Drag the selection box around the area you wish to flip (see
screencap 1D).
3. Go to "Image >> Mirror" or use the shortcut "Ctrl+M"
4. Wa-la! The selection is mirrored (see screencap 2D)! Right-click
on the image to remove the selection box and all is fixed (unless
you're like me
and probably
messed up other minor things as well...
Well, that's it for this tutorial! Go on to color your lineart
as you see fit, or, if you want to try one of my own coloring techniques,
you can try my Comic Coloring
Tutorial. Good luck with your artwork!
|
All artwork on this page, unless stated otherwise, is © 2005 Briana
Higgins. While this page is used for educational purposes, none
of my art may be copied or taken without my explict written consent. |